雨云这个论坛啊,嘶,这么轻量?这么简便?怎么做到的!!!不行!我也得做一个!!!我翻了好多论坛,终于!我找到了!跟雨云一模一样的论坛!!!
他就是iscourse!这个论坛我自己也搭建了,看到成品后,欸?怎么这么眼熟?

啧啧啧,而且真的不要太简单了!!!(自建雨云的第一步!)
嘶,除了服务器有点吃不消
所以,第一步,还是购买服务器。
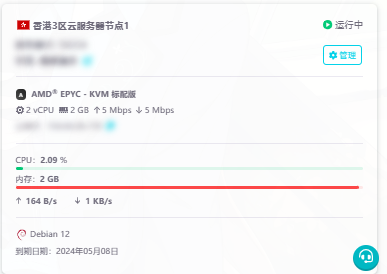
有了我的经验,我给大家推荐:(要跑 Docker,等下要安装1P面板,不机器配置高一点,等下机器卡布斯尼)4核心4GB的内存
从注册雨云开始,第一步,注册雨云,优惠码填写yhsheqv或者直达:雨云 - 新一代云服务提供商
直达,建议香港三区或者美国,最近香港三区经常被打,换线路了,所以应该不会被打了,反正大不了给补偿。
然后呢就继续然后
我们需要购买一台云服务器,建议4-4,真心推荐啊,4-4

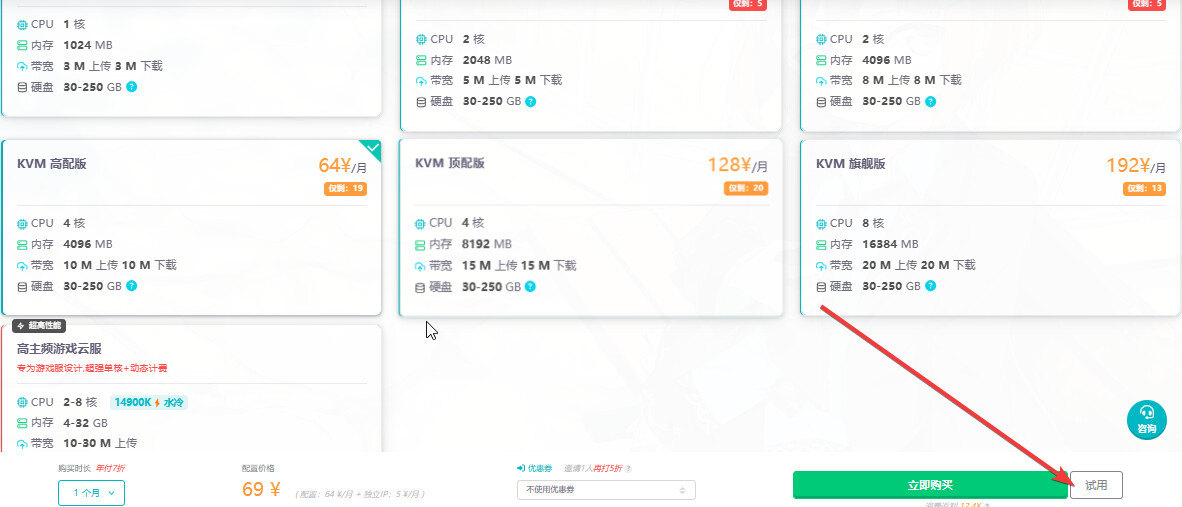
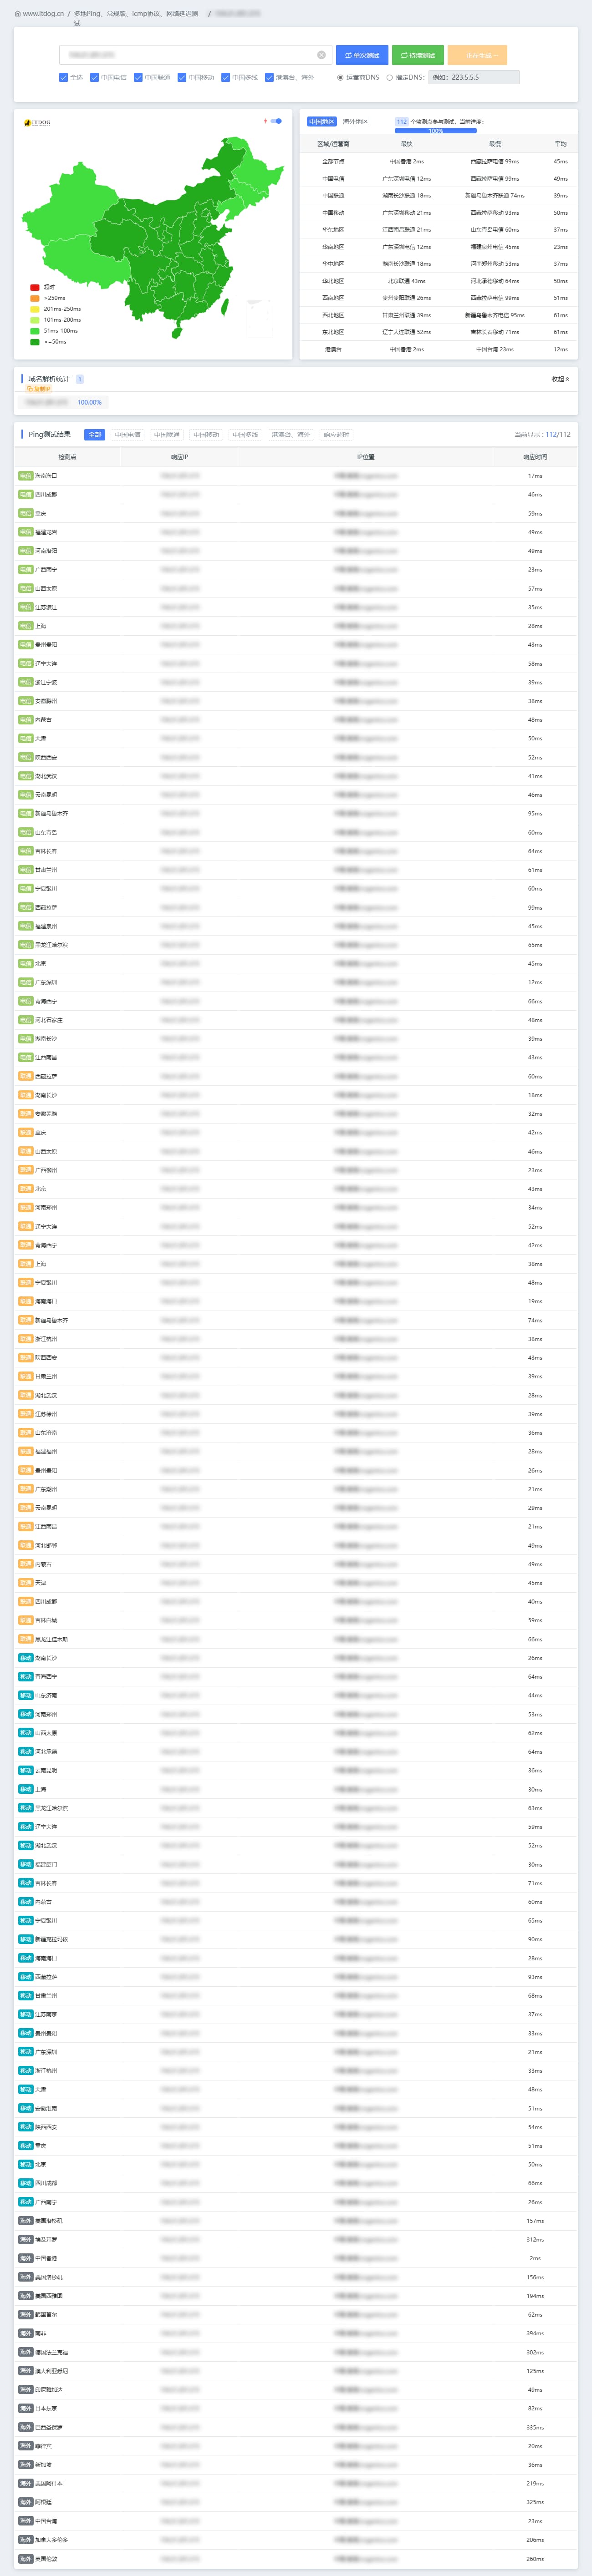
支持试用,3网直连线路,仅
需60+就可以拿下4-4,放一张ping图,大家自己体验速度
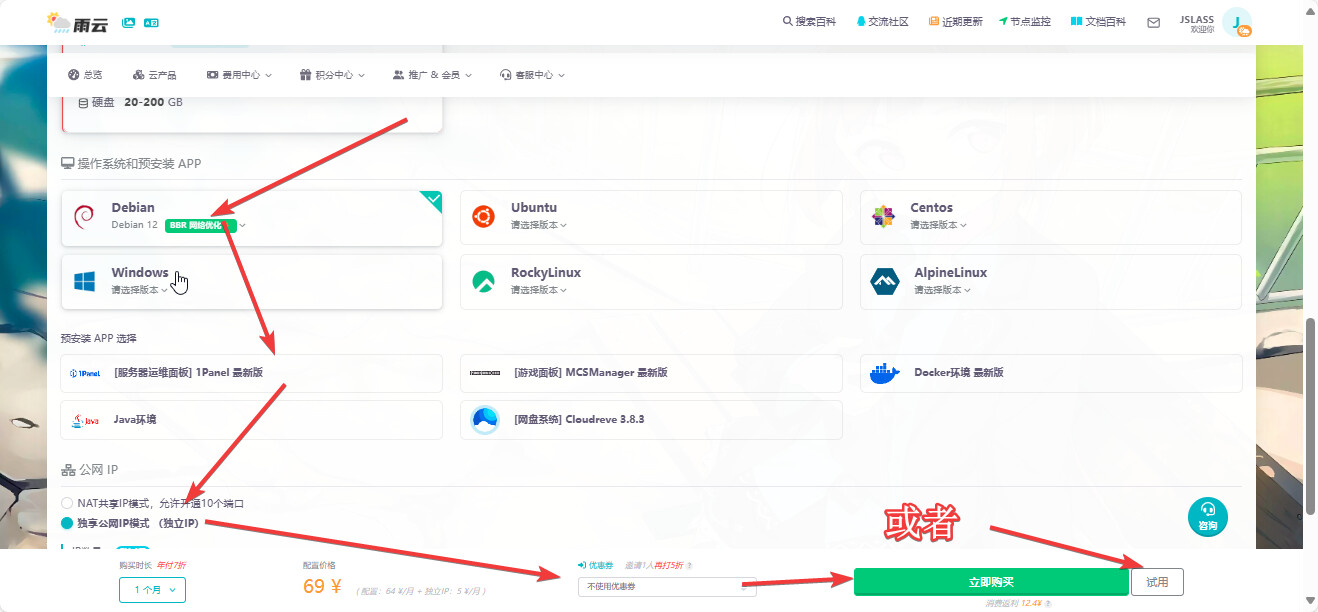
系统我们选择地板12
支持1元试用哦(我前天试用了一台8-16的机器,结果刚好出现故障,补偿了5天的时间,血赚!)
等待系统创建一下。
等到安装成功,1P我们需要手动修改密码,不过1P我们可用可不用的。
ssh远程链接我们的服务器。
输入指令
apt update
apt upgrade -y
apt install git
正常来说是可以的,或者预装 Docker,免得等下安装。
1P也就是 Docker运行的。
记得!一个一个输入命令!!!
别跟个**一样的,一股脑全输入了。
继续依次输入:
sudo -s
git clone https://github.com/discourse/discourse_docker.git /var/discourse
cd /var/discourse
chmod 700 containers
这一步sudo -s 如果操作不仔细,会在安装的时候出现一些创建莫名失败的提示,导致安装失败,是因为没有权限导致的。 下载完以后,执行安装向导
./discourse-setup
然后根据提示输入要绑定的域名,第一次安装时间比较久,建议先除了主域名以外其它,随便乱填,然后后面能够成功再重新构建,看不懂的可以用截图加微信图片翻译,邮件可以用阿里云的邮件服务 。或者飞书的公用邮箱再或者你自己的邮箱。
记得,这个论坛BUG有点多,如果说是443端口或80端口无法通讯,你检查域名解析,然后重新安装,有可能是BUG,这个SSH命令阶段没啥好讲的,有手就行了。
curl -sSL https://resource.fit2cloud.com/1panel/package/quick_start.sh -o quick_start.sh && sudo bash quick_start.sh
这个命令,我们安装1P(刚刚预装了的可以忽略)
我们进入1P的管理面板。
可以在容器里面看到APP
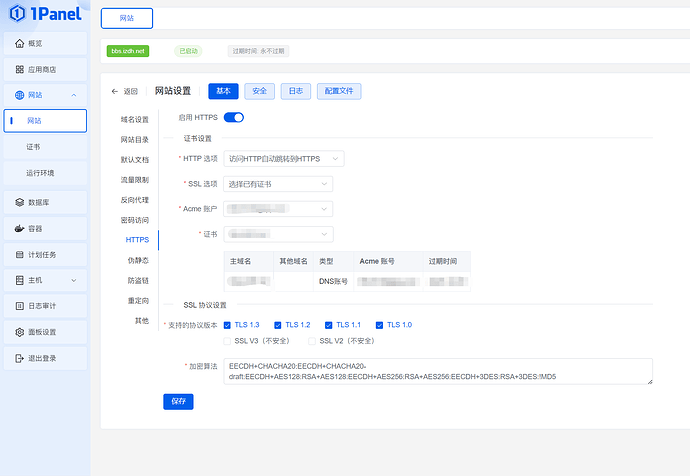
我们需要创建SSL证书,可以在腾讯的DNSPOD或者雨云也可以免费申请SSL证书哦。
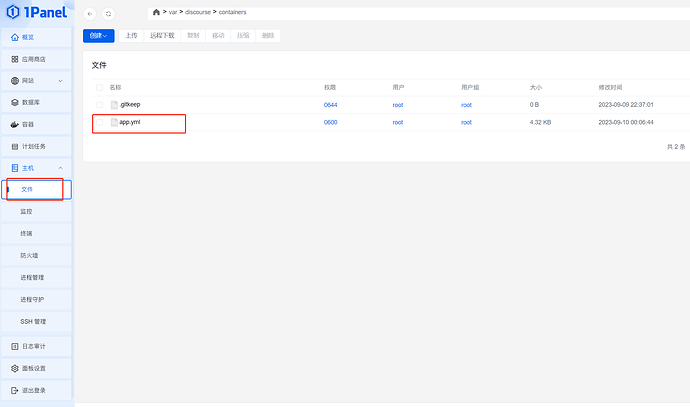
然后进入文件,编辑app.yml,主要修改的地方,用中文注释了。
## this is the all-in-one, standalone Discourse Docker container template
##
## After making changes to this file, you MUST rebuild
## /var/discourse/launcher rebuild app
##
## BE *VERY* CAREFUL WHEN EDITING!
## YAML FILES ARE SUPER SUPER SENSITIVE TO MISTAKES IN WHITESPACE OR ALIGNMENT!
## visit http://www.yamllint.com/ to validate this file as needed

templates:
  - "templates/postgres.template.yml"
  - "templates/redis.template.yml"
  - "templates/web.template.yml"
  ## Uncomment the next line to enable the IPv6 listener
  #- "templates/web.ipv6.template.yml"
  - "templates/web.ratelimited.template.yml"
  ## Uncomment these two lines if you wish to add Lets Encrypt (https)
  - "templates/web.ssl.template.yml"
  - "templates/web.letsencrypt.ssl.template.yml"

## which TCP/IP ports should this container expose?
## If you want Discourse to share a port with another webserver like Apache or nginx,
## see https://meta.discourse.org/t/17247 for details
expose:
  - "80:80"   # http
  - "443:443" # https

params:
  db_default_text_search_config: "pg_catalog.english"

  ## Set db_shared_buffers to a max of 25% of the total memory.
  ## will be set automatically by bootstrap based on detected RAM, or you can override
  db_shared_buffers: "128MB"
  ## 修改附件上传的最大值
  upload_size: 300m
  ## can improve sorting performance, but adds memory usage per-connection
  #db_work_mem: "40MB"

  ## Which Git revision should this container use? (default: tests-passed)
  #version: tests-passed

env:
  LC_ALL: en_US.UTF-8
  LANG: en_US.UTF-8
  LANGUAGE: en_US.UTF-8
  DISCOURSE_DEFAULT_LOCALE: zh_CN

  ## How many concurrent web requests are supported? Depends on memory and CPU cores.
  ## will be set automatically by bootstrap based on detected CPUs, or you can override
  UNICORN_WORKERS: 2

  ## TODO: The domain name this Discourse instance will respond to
  ## Required. Discourse will not work with a bare IP number.
  ## 修改主域名
  DISCOURSE_HOSTNAME: bbs.izdh.net

  ## Uncomment if you want the container to be started with the same
  ## hostname (-h option) as specified above (default "$hostname-$config")
  #DOCKER_USE_HOSTNAME: true

  ## TODO: List of comma delimited emails that will be made admin and developer
  ## on initial signup example 'user1@example.com,user2@example.com'
  ## 修改管理员邮箱
  DISCOURSE_DEVELOPER_EMAILS: 'xxxx@gmail.com'

  ## TODO: The SMTP mail server used to validate new accounts and send notifications
  # SMTP ADDRESS, username, and password are required
  # WARNING the char '#' in SMTP password can cause problems!
  ## 修改发信邮箱服务器
  DISCOURSE_SMTP_ADDRESS: smtpdm.aliyun.com
  ## 修改发信邮箱端口
  DISCOURSE_SMTP_PORT: 80
  ## 修改为自动发信邮箱账号
  DISCOURSE_SMTP_USER_NAME: xxxx@xxx.net
  ## 修改发信邮箱密码
  DISCOURSE_SMTP_PASSWORD: "dj6bCRxoHt25NcD6"
  #DISCOURSE_SMTP_ENABLE_START_TLS: true           # (optional, default true)
  DISCOURSE_SMTP_DOMAIN: smtpdm.aliyun.com
  ## 修改为自动发信邮箱账号
  DISCOURSE_NOTIFICATION_EMAIL: xxxx@xxx.net
  DISCOURSE_SMTP_ENABLE_START_TLS: false
  ## If you added the Lets Encrypt template, uncomment below to get a free SSL certificate
  LETSENCRYPT_ACCOUNT_EMAIL: me@example.com

  ## The http or https CDN address for this Discourse instance (configured to pull)
  ## see https://meta.discourse.org/t/14857 for details
  #DISCOURSE_CDN_URL: https://discourse-cdn.example.com

  ## The maxmind geolocation IP address key for IP address lookup
  ## see https://meta.discourse.org/t/-/137387/23 for details
  #DISCOURSE_MAXMIND_LICENSE_KEY: 1234567890123456

## The Docker container is stateless; all data is stored in /shared
volumes:
  - volume:
      host: /var/discourse/shared/standalone
      guest: /shared
  - volume:
      host: /var/discourse/shared/standalone/log/var-log
      guest: /var/log

## Plugins go here
## see https://meta.discourse.org/t/19157 for details
## 安装2个插件
hooks:
  after_code:
    - exec:
        cd: $home/plugins
        cmd:
          - git clone https://github.com/discourse/docker_manager.git
          - git clone https://github.com/discourse/discourse-solved
          - git clone https://github.com/discourse/discourse-reactions

## Any custom commands to run after building
run:
  - exec: echo "Beginning of custom commands"
  ## If you want to set the 'From' email address for your first registration, uncomment and change:
  ## After getting the first signup email, re-comment the line. It only needs to run once.
  #- exec: rails r "SiteSetting.notification_email='info@unconfigured.discourse.org'"
  - exec: echo "End of custom commands"
别直接复制!!!你要根据你的区修改而不是复制!!!
修改保存以后,回到终端,使用指令或者在后台停止容器,然后再重构,不过好像没安装这个面板可以不用停止容器,安装这个面板了以后不停止容器直接重构会报错。
./launcher stop app
./launcher bootstrap app`
等待重构完成,执行容器启动命令。
./launcher start app
进入discourse,会提示发邮件激活,如果收不到,可以用下面指令,创建一个管理员账号直接跳过,然后在左边设置里语言设置为中文即可,然后有个地方可以发邮件测试,会提示报错原因,多试几次就可以成功了。
./launcher enter app
rake admin:create
如果需要创建其它网站,直接参考官方的教程 9,比较简单就不详细介绍了,也可以在网站里,新建一个环境,然后网站权限修改成777,就可以安装各种程序了。

主要解决的问题,可以一个服务器运行几个网站,这样节省了买服务器的费用,而且更加适合新手。
后面测试邮件发送的时候发现的一个问题:
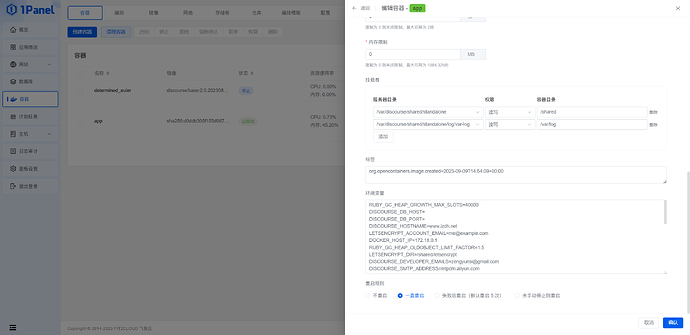
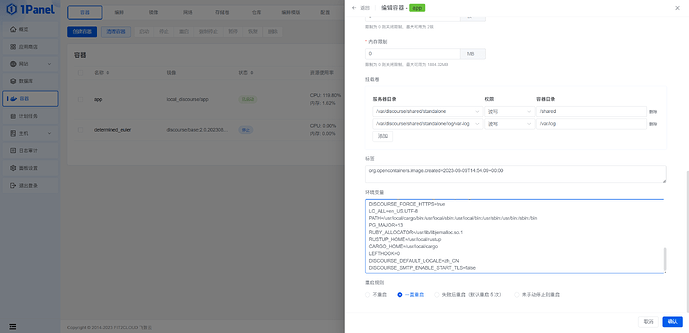
容器的这些设置,编辑app.yml里面,重构好像并不起作用,需要在容器环境变量这里修改,不过只需要5-6秒就可以生效,对插件安装有没有影响还不太清楚。
和其它网站共存好像就是先新建一个反向代理,然后把默认的容器443端口改成一个10443,然后要配置证书,就能正常访问了。
反向代理
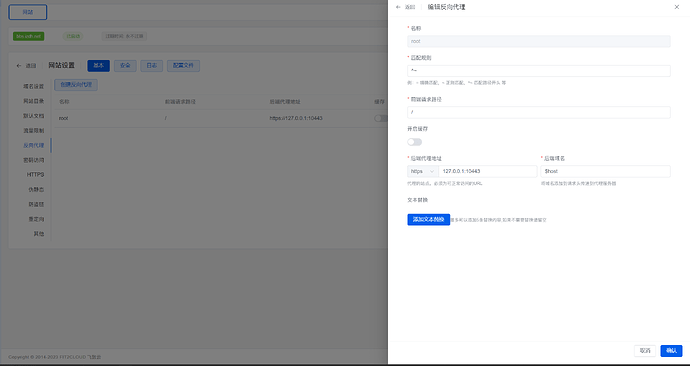
配置证书
到这里就结束了!
这个,我只能说是一模一样,不信的大家自己去尝试。
雨云的论坛其实也是基于他而作更改的哦~
我如果有时间,也会把论坛做出来,大家一起分享快乐有趣的事情!
如果有疑问,大家可以问问哦(反正我也不会[手动狗头])
UID:191333